This post may contain affiliate links.
Tired of shouting over a noisy RV air conditioner that struggles to keep your rig cool? We were too, until we discovered a simple mod that made our RV AC units so much quieter and way more efficient. The best part? You can do this mod yourself, and it cost around thirty bucks in parts! In this article, we’ll tell you all about it and share the easy steps to this game-changing RV air conditioning upgrade, so you can enjoy a cooler, quieter RV without breaking the bank. Let’s get started!

This RV Air Conditioner Mod Is Cheap and Easy
First, rest assured this is a pretty easy do-it-yourself job. You’ll find the parts needed are widely available from your local hardware store, and you only need a few simple tools that you probably already carry in your RV.
Keep in mind, while I said this was a cheap and easy fix… I didn’t say quick! This DIY job will likely take you one to three hours per air conditioner, depending on which type of a/c unit you have. But once you are done, you will enjoy the benefits for many years to come!
More good news… you don’t need to get up on the roof! These a/c upgrades happen inside the RV and out of the weather. Depending on your height and the height of your RV ceiling, you might need a small ladder or step stool to easier access.
If you don’t want to DIY and prefer to pay more for a kit, you’ll find those here.
Related Article:

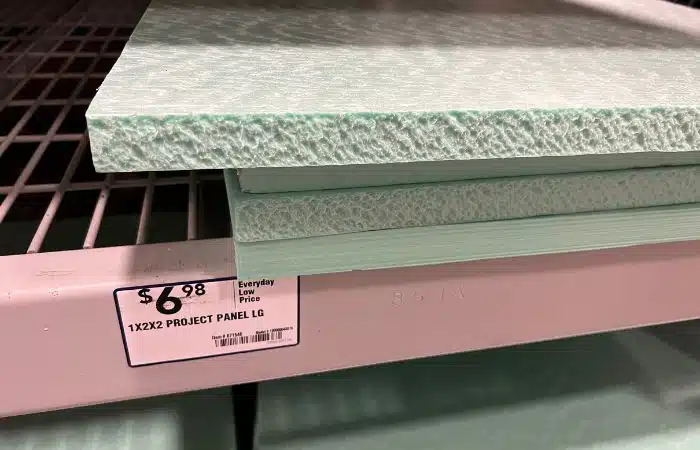
These are the main supplies you’ll need for this RV air conditioner mod
What Tools And Supplies Will You Need For This RV A/C Modification?
Yep, that’s right. You won’t need to special order any expensive RV parts. That’s music to any RVers’ ears! Everything you need can be found at your local big-box home improvement store, like Home Depot or Lowes.
What supplies will you need?
You’ll need 1” foam insulation board and shiny metal-type/foil air duct tape. Here’s what you’ll need for each air conditioning unit:
- 50 feet of 2″ tape approx
- One 2’x2′ size square of 1″ foam board.
If you are not near a store, you can also order your supplies from amazon. When ordering foam board on amazon, it will come in a pack of smaller boards for easier shipping. Plan for 1-2 of the board shown in the link below, per air conditioner.
The foam insulation is sturdy and holds its shape, so it provides its own structure. The tape is used to smooth out gaps and install the foam insulation. The tape also reduces wind resistance, making the RV air conditioner quieter and more efficient.
What tools will you need?
The list of tools is also simple. You’ll need a screwdriver, a small socket set or an adjustable wrench, a straight edge like a metal rule or board, a pencil or pen, measuring tape, and a utility knife. The job will be easier and turn out even better if you have a jig saw, especially if it can cut at angles. But it’s not necessary. If you have a Dometic RV air conditioner, like we do, you may also need a prying tool. And if you cannot reach your RV air conditioner unit and vents, grab a step stool or small ladder.
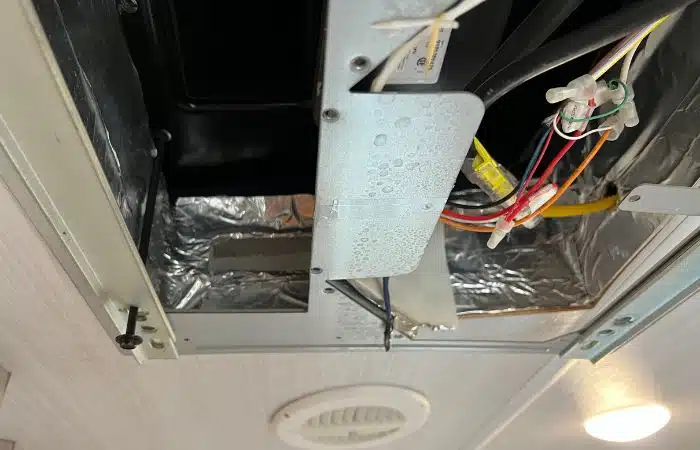
A look at our Dometic air conditioner after the first access panel was removed. The second panel, which helps secure the a/c to the roof, will also be temporarily removed.
Does This Modification Work On All Types Of RV Air Conditioners?
This RV a/c upgrade is for RVs with a ducted air conditioning system. The most commonly used RV a/c units brands are Dometic and Coleman Mach, and we have personal experience with both. But these principles would likely help improve other brands, too.
We learned about this RV A/C mod from our friend Dennis, who showed us the improvements he made to his own Coleman Mach RV air conditioners and raved about them. We were so impressed we began researching how we could make this mod to the two Dometic air conditioners in our East to West Tandara fifth wheel.
The photos shared in this post are from the two Dometic air conditioners inside our RV. You’ll find videos of both types of RV air conditioner mods shared further down.

I borrowed a friend’s jig saw for this mod, but a utility knife and a rule work just fine
Why This Simple RV Air Conditioner Modification Is Needed?
There are a few reasons why RV air conditioners are noisy and inefficient in the first place:
- Inadequate insulation between the warm air coming into the air conditioner, and the cool air being blown out
- Air turbulence in the unit and the air ducts
- Inadequate sound dampening
This RV a/c upgrade improves all three reasons simultaneously, making your air conditioner more efficient and quieter. In fact, it is estimated this mod can reduce noise by 30% and increase a/c airflow efficiency by 40%. We completely agree with these estimates, based on our personal experience since making this mod. It really is amazing how much better our RV a/c’s work now!
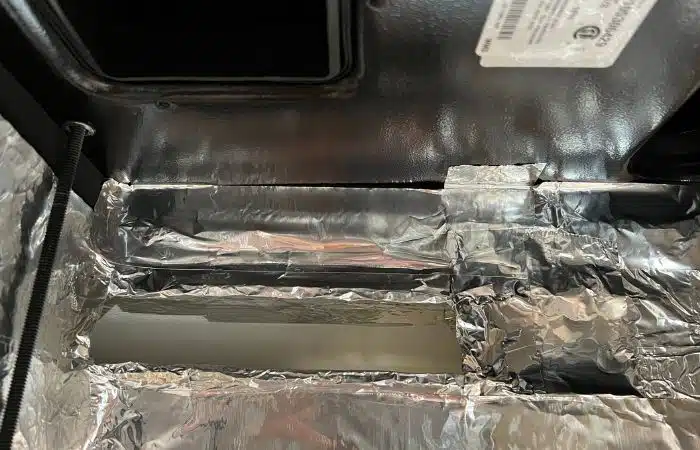
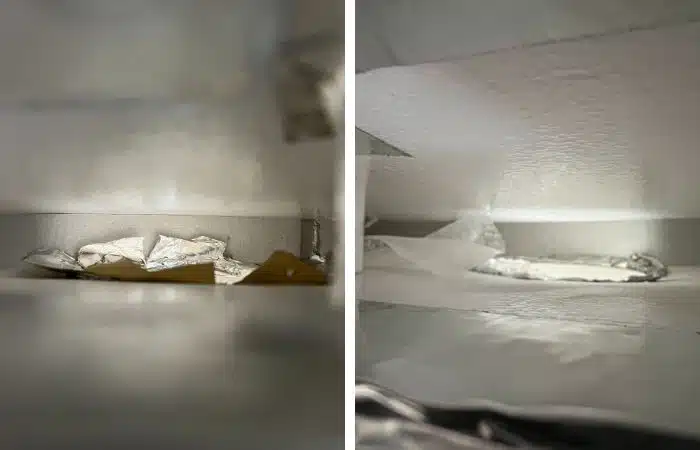
Before the mod, more than 30% of the air vent above was blocked by tape. After the upgrade, we have full airflow
RV Air Conditioner Unit Mod: Overview of Steps
The main goals of this RV a/c upgrade are: improving sound and temperature insulation, and reducing air turbulence. The modifications are made inside the air conditioner unit, and the air ducts.
Here are the high-level overview steps we followed to make this RV a/c mod to give oyu an idea of just how simple it is. You’ll find more detail in the videos (created by others, for both types of A/C – Dometic and Coleman) toward the end of this post.
Step 1: Remove access panels
Remove access panels for the a/c unit inside the RV. For a Dometic RV air conditioner, remember that you must complete the entire upgrade before you move the RV. And you should avoid doing this in bad weather. That’ s because you need to temporarily remove what holds the RV air conditioner unit in place on the roof, creating the weather seal.
Step 2: Remove hot cold air divider
If it is a Dometic RV air conditioner, you’ll need to remove the lame metal divider between the hot and cold air (you’ll see why these are so darn inefficient!) You might be able to remove it with a standard screwdriver, but I used a pry bar.
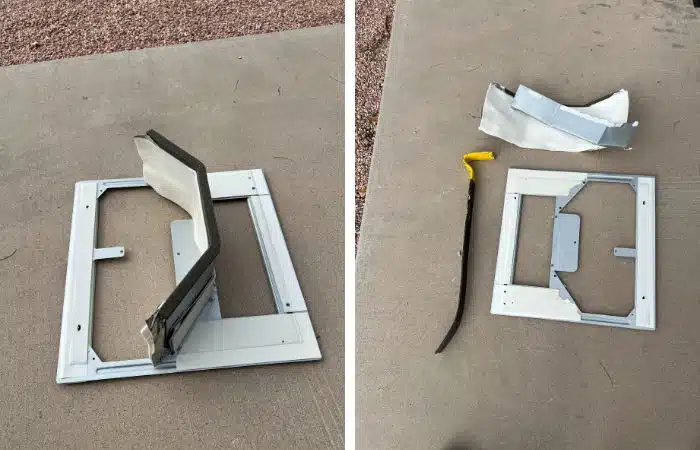
Dometic air conditioner with metal divider on left, and after removed on the right
Step 3: Tape to create smoother airflow
Remove air duct vents and tape down loose material to create smoother airflow, then replace the vents.
Step 4: Measure and cut boards
Fully open up (expose) air duct vents at the main RV a/c unit if obstructed. Then tape down and smooth out the air ducts you can reach. If you have a Dometic RV air conditioner, measure, cut, and install the center divider between the warm and cold air. Then measure, cut, and install the remaining angles, side walls, or other insulation needed to smooth out the main a/c exhaust.
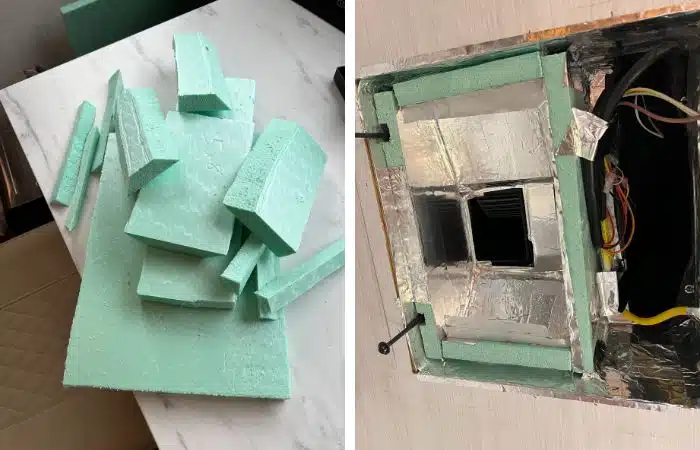
Selection of cut foam board pieces on left. Installed and partially taped on right
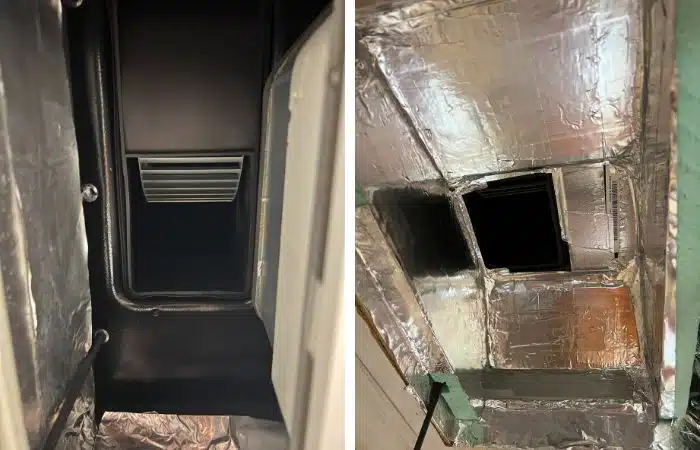
RV air conditioner exhaust before and after installation
Step 5: Install board shapes and tape to smooth out
Measure, cut, and install the new air conditioning vent base and pyramid shapes to smooth out the airflow. Tape over all insulation board for the smoothest finish and best insulation. Then re-install the RV air a/c access panels you removed in step 1.
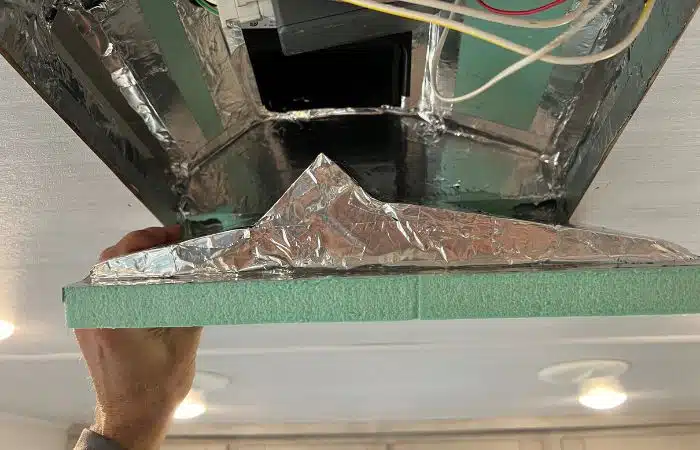
Mostly taped up installation and bottom piece with pyramid divider about to be installed
Step 6: Turn on your RV A/C and enjoy the difference!
The moment of truth… turn on your RV air conditioner and notice just how much quieter and more efficient your RV air conditioner is! And now’s the ideal time to do it, ahead of the hottest summer days ahead of us.
This is one cheap and easy RV a/c upgrade you’ll love and enjoy so much, you’ll want to rave to your RV friends about it, too! So feel free to share this article with your RVing friends – they’ll love you for it!

We’re happy and cool RV campers now after making this a/c mod!
Detailed Videos Of The RV Air Conditioner Modification
Below, we’ve shared a few videos that do a good job of showing how to make this mod on the two main types of RV air conditioners – Dometic and Coleman. Watch them and see which one is the best fit for you.
Dometic RV Air Conditioner Video
This is the video we watched to learn how to upgrade our own Dometic RV a/cs. He did a great job on the video, and it worked out well for us. Good job, mate!
Coleman Mach RV Air Conditioner Video
This is the video our friend Dennis liked when making the modification to his Coleman Mach RV air conditioners. Another very good video.
And here’s another video below, for the Coleman Mach a/c with a slightly different air intake.
Can You Buy a Ready-Made Kit?
Does this like too much work and you’d prefer an easier drop-in and replacement solution instead of having to build your own? Don’t worry, you have options! Some clever folks created an RV A/c Air Flow Kit that you can buy on Amazon. We have no personal experience with either of them, but they appear to be well reviewed with a rating of 4.5/5 or higher. At $170 each, it won’t save you money (our DIY mod cost just $30) but these kits WILL save you time.
Dometic RV AC Air Flow Kit

Coleman Mach RV AC Air Flow Kit

Summary
So there you have it! A simple budget-friendly, and very effective RV air conditioner modification. The time you spend installing it will be rewarded in the many more hours of efficient cooling you’ll get to enjoy. Not to mention being able carry on a conversation while running the a/c without having to shout, because your RV air a/c is so much quieter. This mod was a game changer for us, and we hope it is for you, too! Drop us a note if you do this mod (or have already) and share your results! And stay cool this summer, friends.
Want more RV hacks for how to stay cool?
Sign up for our email newsletter with the latest RV park reviews, news and updates.

Author Bio: Marc Bennett
A Colorado native, Marc is an avid cyclist and hiker who has lived, worked, and traveled by RV to all 50 USA states, while working full-time. He is co-author, with his wife Julie, of two bestselling books: "RV Hacks: 400+ Ways to Make Life on the Road Easier, Safer, and More Fun!" and "Living the RV Life: Your Ultimate Guide to Life on the Road". In RV life, Marc takes care of all the dirty jobs – fixing things, washing dishes, and dumping the black tank.
More DIY Content
Want to check out more do-it-yourself RV mods, upgrades and makeovers? Hover over each image to see the title and article name then click for the full story.

Make this RV Air Conditioner Mod That Works – Quieter AND Cooler!

RV Lithium Battery Upgrade? Easy Drop-in Replacement

10 Easy DIY RV Bathroom Renovation Ideas

How to DIY Replace a Thetford RV Toilet Waste Ball Seal

The State of RV Repairs: Problems and Solutions

RV HACKS. Our New Book is a Bestseller!

12 RV Hacks for Staying Cool this Summer

New RV Awning Replacement Fabric and Slide Topper

12 Lessons Learned from Our RV Renovation

Getting Our RV Ready To Travel After our RV Makeover

What Did It Cost? and RV Renovation Questions

Episode 8 The Final Reveal | Ultimate RV Makeover

Episode 7: Finishing Touches | Ultimate RV Makeover

Episode 6: We’re Nearly There! Ultimate RV Makeover

Episode 4: Re-Building Our RV | Ultimate RV Makeover
GOT COMMENTS OR QUESTIONS?
We would love to hear from you. Drop us a note in the comments section below.